
How to Reverse Sear a Steak Over Charcoal
Guest Post By: BBQ and Bottles
Hey Kick Ash Basket fans! We’re excited about the following article, brought to you by our friends and partners at BBQ and Bottles. In this guide, they’ll walk you through the steps of a perfect “reverse sear” on a charcoal grill. They’ve even included pictures for you from a sample cook they did so that you can follow along at home. (The pictures are making us ravenous for a perfectly-cooked steak.)
What is a reverse sear?
A typical sear is when you first brown the steak’s “crust” and then cook the meat. A reverse sear cooks the meat first and then finishes off by taking care of the outside of the steak. We love a reverse sear because it creates a golden crust with a tender, juicy center. It’s also easier to control, so it’s a good option for pros and amateur grillers alike. It’s an especially useful cooking method for thick-cut steaks like filet mignon, ribeye, and NY strips.
Start with a quality steak
The most important step in any cook starts at your butcher, when you’re picking out your cut of beef. Whenever possible, we highly recommend purchasing fresh cuts of meat as opposed to frozen. Fresh beef is easier to use and cook, retains its nutrients, and has a much richer flavor. Learn more about grilling fresh versus frozen meats here.
As a general rule of thumb, grain-fed beef will have more marbling throughout the steak that will render down through your cook—making for an exceptionally tender and flavorful steak. Your other option is grass-fed beef. Grass-fed has less marbling, but it tends to result in a richer, beefier taste than grain-fed. Talk to your butcher and try to find some locally sourced USDA prime (or equivalent) steaks that match your flavor preference. They should ideally be cut between 1.25-1.5 inches thick for the best grilling results.
For the cook you see in the photos, we were fortunate enough that our butcher had some hybrid Wagyu and NY strips in stock. These cuts are a cross between purebred Wagyu cattle and American cattle, offering a rich flavor with tight and juicy texture. Of course, we went with those.

Photo by BBQ and Bottles on BBQ and Bottles
How to salt your steak
Once you have your preferred steaks, you’re going to need to season them. Seasoning and rubs are what will differentiate the final flavor of your cook. Check out our scrumptious BBQ rubs here (we have both a sweet and a spicy to suit your taste).
If you’re seasoning your meat, we recommend doing so about an hour before cook time. Take your steaks out of the fridge and season them with kosher salt (or any other non-iodized salt you have in your pantry). You can also throw on any other salt- or spice-based rubs, if you so choose. (But salt works beautifully on its own, too!)
It's imperative that you only use as much salt as you would typically use to season your steak. All of the salt will absorb into your steak, so you don’t want to over season it with too much salt. This becomes like a brine, breaking down the muscle fibers of the meat so it’s absorbed for that super juicy and delicious flavor. (That’s why you should salt before grilling, not after.)
Let the steaks rest for an hour so they can absorb the salt and come up to room temperature. You want your steaks to come to room temperature so they’ll cook easily, but don’t leave them out for more than an hour or you’ll risk them going bad.
Tip of the trade: While your steaks are resting, utilize that time to play with the dog, chat with your partner, hang out with the kids, or prep the remainder of the meal.

Photo by BBQ and Bottles on BBQ and Bottles
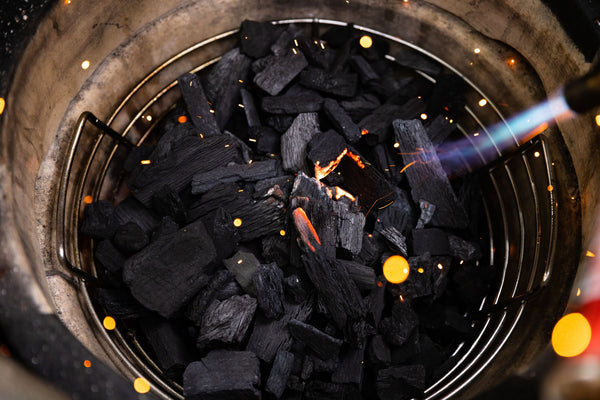
Setup your grill and Kick Ash Basket
Light up a chimney full of all-natural lump charcoal and give it 10-15 minutes to ignite. Set up your kettle with the Kick Ash Basket and get the divider in the right position for the amount of charcoal you're using.
I love this feature of the Kick Ash Basket because we don’t always use a full chimney of charcoal on our cooks and being able to adjust the divider is a nice touch for direct and indirect grilling! Dump your charcoal into the kettle and close the vents so they’re about a quarter open. You’re aiming for a grill temperature of 225-250 °F, so adjust the vents accordingly to get your temps dialed in.
Get the details about setting up your charcoal grill for the perfect, even cook here.
Photo by BBQ and Bottles on BBQ and Bottles
The cook
Place the steaks on the grill on the opposite side of the charcoal (this is where your Kick Ash divider comes in handy!). Put the lid back on with the vents directly overtop the steaks so the smoke hits them as it comes off the charcoal before escaping the grill. That’s how the cook really happens. Learn more about how grilling works here.
Once your steaks hit an internal temp of 100 °F, take the steaks off and let them rest for 5-10 minutes. Leave the lid off the grill to get the charcoal ripping hot.
After the steaks have rested, place them back on the grill directly over the charcoal for their final sear. Flip the steaks periodically to ensure they get an even char on both sides. Remove the steaks once they hit an internal temp that matches your desired degree of doneness (130 °F for medium rare, 140 °F for medium and 155 °F for well done). The crust should be a charred dark brown, not a burned black.
Which type of sear is better? Direct charcoal grilling or cast iron pan? We’re huge fans of the grill sear. A cast iron pan is just a wannabe-grill, if you ask us. When you use the charcoal grill to sear the crust of your meat, you get a golden brown crust that retains the juice of the cut while adding that smoky, rich flavor we crave from the charcoal grill.

Photo by BBQ and Bottles on BBQ and Bottles
Resting and slicing
Let the steaks rest on a cutting board for another five minutes before slicing. This is the time to add freshly ground black pepper if you’d like. We like slicing the steaks up before serving them—there’s just something luxurious about not having to cut your own steak. It’s also great if you have kids who aren’t going to eat an entire steak; they can just take as many slices as they want.
Don’t forget to remove the heat, dispose of your coals safely, clean the grill, and keep kids (and adults) away from the grill until it’s cool. Learn more about grilling safety here.

Photo by BBQ and Bottles on BBQ and Bottles
About BBQ and Bottles
BBQ and Bottles started an online grilling and BBQ community in hopes of inspiring more people to grill or barbecue at home, to slow down the pace of life for just a brief moment and to create your own memories with family & friends. (Sounds similar to Kick Ash Basket’s motto!) Some of the best memories we've created over the years have been the result of toiling away over a hot, grilled meal that gets shared with friends and family.
In this age of technology, the dinner table is one of the last few places where everyone puts their phones down to connect again as humans. It's these moments that justify the effort that goes into making the meal, and that effort is just another way of showing people some love. Grilling is love, and that’s what Kick Ash Basket + BBQ and Bottles are all about.
Did you love learning how to reverse sear a steak? Check out more of BBQ and Bottle’s detailed recipes and guides on their YouTube channel.